Darmah Engine Overhaul

Post your general FAQs, comments & questions regarding all Ducati engine & transmission restoration here. [Specific engine FAQs should go in the 'BevelHeaven Garage' section.]
hashashan
Mach 3
Posts: 88
Joined: Wed Oct 07, 2009 11:42 am

Darmah Engine Overhaul

Post by hashashan »

Hello,
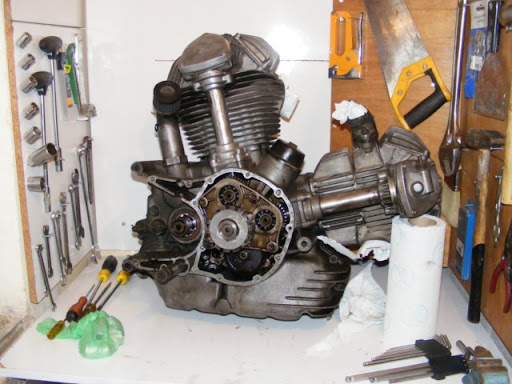
After many attempts to fix stuff in my darmah, some successfull, some less I decided that full engine overhaul is needed, due to fuel smelling of oil and weired knocking sounds coming from the lower engine.

now before I throw myself into the deep water I wanted to get some advices.
first the manual skips the "how to safely remove the engine from your bike :) " part, any advices there?

I am about to memorize the manual before I start stuffing my fingers into the engine but what else can I do there? any other info about this? I planned to replace the pistons, rings, all the bearings, and vlaves(by the way, where do I get these? ) any other things I should do? or not do?

I saw that in the manual there are several purpose specific tools, do I really need all of them? or some can be skipped and just improvised?

I have so many questions ... :oops:
bobnorton
860 GT / GTS
Posts: 279
Joined: Wed Jan 16, 2008 2:18 am
Location: bromley kent

Post by bobnorton »

A good experienced bevel mechanic will probably spend at least two days rebuilding a motor using a number of special tools , the crank is a specialised job and its not worth doing the job without a crank strip.If the motor has not been down before then its time.This is not a shade tree job.I have rebuilt singles but not a twin ,I expect double trouble!
rwhc80
750 GT
Posts: 174
Joined: Sat May 16, 2009 7:19 am
Location: Melbourne Australia

Post by rwhc80 »

Reading your post, you mention "before jumping into hot water"
I guess the first question is, what mechanical experience do you have ? or how far have you ventured into the Bevel engine in the past ?

Anything is possible, and if your up for it, there is endless information available, inc this forum. You will definatley need "some" specific tools and some areas will most likely need to be farmed out, IE Crank, Heads, ect, but you can save a good deal of money by undertaking some of the work, apart from the satisfaction of completing the rebuild, and bragging to all your mates. If your in a club they will quite often have some, or all of the tools available.

Steve will be able to supply many of the parts, and i'm sure the guys on the forum will help along the way with technical info or suggestions for machine shops ect in your area.

For what it's worth, I would suggest you make a realistic evaluation of your abilities, and if you decide to go ahead, take it a step at a time and keep us updated ?
Cheers
Rick
I have desmo disease, I just hope they never find a cure !!!
hashashan
Mach 3
Posts: 88
Joined: Wed Oct 07, 2009 11:42 am

Post by hashashan »

well actually this is my first bevel or engine at all, never messed with the insides of an engine unless we count valve clearance adjustments on japs.

however i have a good technical and mechanical head and a lot of high hopes :)

besides a friend of mine who can help from time to time bought his Indiana in boxes and assembled it, including all the engine parts, so he has some experience in ducati engines(not bevel though).

I am not a member in a ducati club and I am not aware of any ducati clubs in my country(Israel). of course im not going to do everything by myself. I will nto balance the crank myself and some more work that is not too possible to make in a home workshop.

I am taking the engine off the motorcycle this Friday and putting it in my workshop, as soon as ill do that i will flood the forum with pictures from my progress and I guess that tons of questions will come along.

but before I do that I was hoping to get some do's and don'ts (if there are any) in the engine removal process, I really dont want to mess things up in this early stage.
rwhc80
750 GT
Posts: 174
Joined: Sat May 16, 2009 7:19 am
Location: Melbourne Australia

Post by rwhc80 »

OK Hashashan,

Get your mate to help with this it makes it much easier and safer.

Once you remove tank and seat, take some photos for later reference of cable routing & fixing ect.

Disconnect all required electricals, Carbs, ect, and remove both alloy side covers to avoid damage, as it's very easy to gouge them on the downtubes when lowering the engine out. Trolley jack is good under the sump with a timber block to again avoid damage. This will take the weight just enough to remove front and top rear engine bolts. ( This allows engine to pivot forward on bottom rear bolt. ) Then lower rear.

Some people elect to raise the frame up with a hoist or block and tackle rather that lowering the engine, never done it myself, but it sounds logical. This is just my version, and some may disagree but it's worked for me
Cheers
I have desmo disease, I just hope they never find a cure !!!
hashashan
Mach 3
Posts: 88
Joined: Wed Oct 07, 2009 11:42 am

Post by hashashan »

well raising the frame is simply impossible for me so ill be lowering the engine.

removing the side covers sound like a good idea. ill need to drain the oil first, i was thinking to drain it after I get the engine to the workshop because the oil draining bolt is really stuck, well ill just try to open it with an impact screw gun.
by the way if anyone has a good methodology to open stuck bolts ill be glad to hear it.
bobnorton
860 GT / GTS
Posts: 279
Joined: Wed Jan 16, 2008 2:18 am
Location: bromley kent

Post by bobnorton »

when somethings really stuck ,a good soak in penetrating oil ,heat with a gas torch and tighten a bit if possible,this sometimes breaks the seal but does not damage the faces needed for undoing.Wire brush exposed rusty threads. Sometimes a hacksaw or angle grinder is usefull!!Drill out starting with a small drill and pick-out whats left.
hashashan
Mach 3
Posts: 88
Joined: Wed Oct 07, 2009 11:42 am

Post by hashashan »

its not rusted into the hole, my mechanic jsut closed it with an impact and well i wasnt able to open it with any key
garryc
Parallel Twin
Posts: 104
Joined: Wed Dec 26, 2007 4:53 pm
Location: Forster NSW Aust

Post by garryc »

Try this link for additional info
http://www.ducatimeccanica.com/#rebuild
hashashan
Mach 3
Posts: 88
Joined: Wed Oct 07, 2009 11:42 am

Post by hashashan »

thanks for the link and advices.
I took the advice of taking off the covers first it was really helpful. I couldn't take out the engine under the bike so with some help we just lifted the frame from the engine :)

now the engine rests in my small working place waiting for further progress.
I guess that the next step will be removing the heads, right?

Image

I uploaded my pictures here :
http://picasaweb.google.com/Hashashan/DucatiRebuild#
please take a look, I will be grateful to hear advices about my previous and further work.
rwhc80
750 GT
Posts: 174
Joined: Sat May 16, 2009 7:19 am
Location: Melbourne Australia

Post by rwhc80 »

Well done hashashan,

Yes, the heads "can" go next, but I would make some observations and take some close up photos of the arrangement and position of the bevel gear assembly before final pull down. The bevel gears all have dots to indicate alignment. ( Top & Bottom ) Make yourself comfortable with the setup, as it will make it easier on re-assembly.

Be careful not to damage any head & barrell fins, they are easily broken.

I like to keep specific nuts, bolts washers for a particular section together in a marked container. I normally use clean plastic take-away food containers, as they can simply be thrown away once the job is finished.
It is very frustrating and time consuming looking for missing parts !
Regards Rick
I have desmo disease, I just hope they never find a cure !!!
hashashan
Mach 3
Posts: 88
Joined: Wed Oct 07, 2009 11:42 am

Post by hashashan »

I am going to overall the lower engine as well so there is no need to mark the bevel positions right? ill have to re-time everything anyway(how hard is that ? )
the "head and barrel fins" are the cooling fins on the heads?
notanumber
Mariana
Posts: 25
Joined: Wed Feb 03, 2010 3:04 am

Post by notanumber »

garryc wrote:Try this link for additional info
http://www.ducatimeccanica.com/#rebuild
Just had a quick look at these step-by-step instructions: I was interested to note that for the top end it shows the camshaft support plate & bearing being removed (picture 10) BEFORE measuring the valve clearances ... would that not mean the camshaft would then be free to float, affecting the measurements? Or have I misunderstood it?
wdietz186
Cagiva Alazzura
Posts: 707
Joined: Sun Sep 10, 2006 5:40 pm

Post by wdietz186 »

Removing the support bearing will affect the valve clearance,usually by a couple of thou depending on how worn the bearings that support the other side of the shaft are.
rwhc80
750 GT
Posts: 174
Joined: Sat May 16, 2009 7:19 am
Location: Melbourne Australia

Post by rwhc80 »

Hashashan,

My suggestion was not to mark the bevel gear positions, but rather to simply make yourself familiar with the setup ! If you're confident that's great ! but as you reported, never having pulled a bevel engine down, it's worth taking your time and making some notes. It all looks simple when the engine is already assembled, but a little more difficult when you're staring at a bucket of bits.

Yes the fins are the cooling fins on the head and barrell. They can be repaired if broken, but a good welder is required.

Good luck
Rick
I have desmo disease, I just hope they never find a cure !!!
Post Reply

Return to “Engine & Transmission Shop”