
Hi bevels
For 750/900
All of us know that the crankshaft end float must be nil (00,00 mm) and we do that with the thust washer. But I don´t know how much have I to tight it ?
For example: with a washer of +0.3 mm, I have a little of end float , but wiht a washer of +0,2 mm, the crank is too tight but it goes round.
Is there anything (trick?) that I would know to reach the perfect tight?
Best regards
Gonzalo
V twin: crankshaft end float - zero
end float
I`ve always gone for just a tiny little bit of pre-load. Assemble the cases with shims and gasket in place and a little end float. Attatch a dial indicator and pull the crank from side to side and note the amount of clearance. Then calculate the shims to take out all float. I have always aimed for .001-.002" (.02-.04mm) pre-load or crush. I have set them to zero before but have always found later, maybe 20,000 km later have had float there again. After speaking with some experts was advised to aim for zero or just a smidgin of pre-load. Done a few now and all are still good. But rememmber that too much pre-load will bring you undone in spectacular fashion and some times with out warning. .002" is absolute out side maximum. If unsure lean toward a little loose, it may get noisey but at least it won`t explode.
It`s worth noting that on the last one I did it had been running with .6mm end float and had been for some years. Was it noisey? You betcha!!!!! Also worth noting that both gearbox shaft shims were all blue from way too much pre-load and the factory seal was still on the cases!!!!!
It is a delicate job however and if your not too mechanically inclined take it to some one who is. Consequences can be nasty.
end float
Oh forgot to mention. If using just a little pre-load, when you pull the crank from side to side to check the float do it by HAND ONLY!!! Resist the temptation to use some sort of levering set up to lever the crank back and forth while checking with the dial indicator and calculating shims. You can lever a little once or twice, and then only lever OUT gentley from the respective sides, to make sure every thing is seated where it should be but the final calculation should only be done with the crank being pulled back and forth by hand!!! Ignore this at your own peril. What ever you do don`t hammer, or push (lever) at the crankshaft ends. This will only serve to sqeeze the the crank cheeks together and give false readings and more than likely damage the crank alignment.
Thank you very much for your excellent answer.
It will be very usefull.
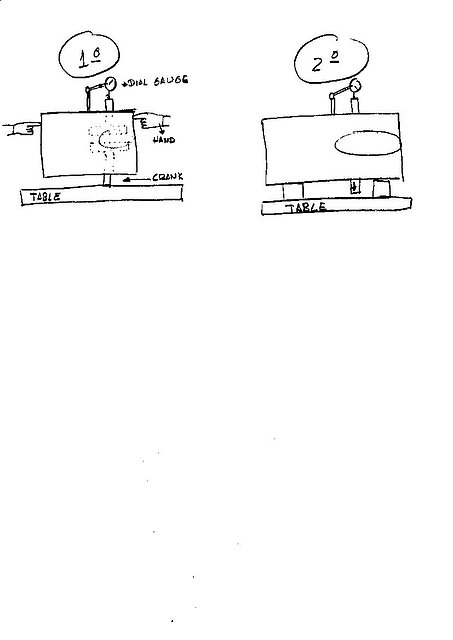
Like I have the engine out of the frame, I had think to check the end float first supporting the engine over the side of crank and after supporting the engine over the case when the crank fall down and measure each position.
I don´t know if you will understand which I want to say, better I draw
Gonzalo
It will be very usefull.
Like I have the engine out of the frame, I had think to check the end float first supporting the engine over the side of crank and after supporting the engine over the case when the crank fall down and measure each position.
I don´t know if you will understand which I want to say, better I draw
Gonzalo
end float
If I had to chose between those two methods Gonzalo I would probably go with number 2. I have an engine stand that I made up and the engine sits in there and mounts through the engine mounting bolt holes. The engine then sits on the bench horizontally as it would do if it were in the frame. I have always then pulled the crank from side to side. I also made up a peice of flat bar with holes drilled through it that I bolt onto the side of the cases and mount the magnetic base of the dial indicator to that. However thats just the way i do it and I`m sure there are other methods. I guess by doing it your way you have gravity working with you one way but against you the other. Drawing number one looks a little shakey to me and I could see the whole thing tumbling over. The other good thing about making a stand is it is much easier to fit your pistons, barrels, heads not to mention all the timing gears and such. There is also no risk of the engine rolling. The first Duc I re-coed I did on a bench with no stand in a loungeroom and it was just a pain trying to keep the thing upright, as you probably know by now the bottom aint flat. But hey, that was in the 80`s and when you got no workshop and the Duc is primary transport you do what ya gotta do. I found it`s always best to go the extra yard at the start, get prepared and the finished product will turn out better. The stands are easy to make, I made mine out of box section and flat bar. You`ll need a welder of course but if you don`t have one surely a friend does. You then have it forever more should you need to do engine work again. Good luck.
There may be a problem to consider on the roundcase 750. The keyed bevel distribution gear behind the rotor on the right end of the crank (0755.29.700) needs to be shimmed to mesh perfectly with it's mate. If there is ANY play in the crank it will affect the meshing of these two bevel gears when the engine is running. When you have play in the crank and then tap on the left end with a plastic mallet to remove the play so you can set the mesh between the two bevel gears on the right end, when the engine is running, and the crank is trying to move left and right, it won't be able to move to the left because the two bevel gears will be forced to bind. Not good. And if you remove the crank play by tapping the right end of the crank, the mesh will again be affected resulting in the gears being too loose. Also not good. The crank bearings specified by Ducati (75143.3380) are designed to be installed with a preload; with less than 0.00mm play.