Hi all,
Would be most grateful if anyone has any manuals/instructions on how to dis-assemble a darmah master cylinder.
help with Brembo Master cylinder strip down
-
BevHevSteve

- SITE OWNER

- Posts: 2325
- Joined: Wed Mar 10, 2004 8:53 pm
- Location: Lafayette, California
- Contact:
richard, remove the lever and remove the banjo bolt holding the brake line. Get a suitable sized drift, insert into the BANJO BOLT END of the master cyinder, compress the piston and give it a couple gentle whacks with a mallet and everything sill come out the lever end. You should get the piston, spring and ruber end piece out. The lever end of the piston will have a seal, flat washer and expansion ring on it.
Steve Allen (925)798-BEVL[2385] Ride'm, Don't Hide'm
Ducati/Euro Spares -> https://Store.BevelHeaven.com
-
Craig in France

- Paso 906
- Posts: 974
- Joined: Tue Mar 23, 2004 3:58 pm
- Location: Montpellier, France
Master cylinder
Hi,
I'm guessing you're asking, "How do I get the old piston out, and get the new one in?"
Take the lever off. Insert a long thin drift (even a stout nail with the end squared off will do) down the outlet of the master cylinder and tap it sharply - not hard - with a hammer. This will overcome the resistance of the interference washer which locates the piston assembly and will allow the assembly to come out.
To insert the new piston, you need to ensure the new washer is properly seated. To do this, insert the new piston assembly - the interference washer goes with the tapered side facing IN - and then push it home firmly using a piece of thin wall tube which has an ID large enuf to go over the piston and onto the washer; and an OD small enuf to fit inside the bore of the master cylinder. Your aim is to spread the washer enuf to hold everything in place. If you want to give it a light rap to make sure, feel free - but don't hit it hard!
Me, I use a bit of old towel rail tubing; others have found a thin-walled, 14mm deep socket does the job. Otherwise, there is a special tool - go http://www.shop.bevelheaven.com/SearchR ... tegoryID=8.
P.s. It also pays to lightly hone the inside the bore. Wrap or glue a piece of fine wet and dry to a wooden dowel, put it into the bore and turn it round a few times. Make sure you clean it out well afterwards!
HTH
Craig
-
MotoMark
- Cucciolo - the Lil Pup
- Posts: 6
- Joined: Sat Aug 02, 2008 8:48 am
- Location: Ft. Worth, Texas
- Contact:
One way to get the old piston out is to use air pressure, but you have to be careful.
What I do is after I have separated the caliper's is to place one half on several towels to cushion the piston. Then you take an air hose and place it in the banjo bolt hole and shoot short bursts of air in it until the piston comes out. By the way it will make a loud 'pop' so be prepared.
What I do is after I have separated the caliper's is to place one half on several towels to cushion the piston. Then you take an air hose and place it in the banjo bolt hole and shoot short bursts of air in it until the piston comes out. By the way it will make a loud 'pop' so be prepared.
Everything starts and ends at exactly the right time
Master Re Assembly
What order do the seal, flat washer and expansion ring reassemble? The seal fits nicely in the expansion ring. But then the seal would go in after the ring if the tapered end went in first. I hope this is not confusing.BevHevSteve wrote:richard, remove the lever and remove the banjo bolt holding the brake line. Get a suitable sized drift, insert into the BANJO BOLT END of the master cyinder, compress the piston and give it a couple gentle whacks with a mallet and everything sill come out the lever end. You should get the piston, spring and ruber end piece out. The lever end of the piston will have a seal, flat washer and expansion ring on it.
-
BevHevSteve
- SITE OWNER
- Posts: 2325
- Joined: Wed Mar 10, 2004 8:53 pm
- Location: Lafayette, California
- Contact:
Look at the photo of this kit in my shopping cart as I purposely stacked the bits in order
Steve Allen (925)798-BEVL[2385] Ride'm, Don't Hide'm
Ducati/Euro Spares -> https://Store.BevelHeaven.com
-
BevHevSteve
- SITE OWNER
- Posts: 2325
- Joined: Wed Mar 10, 2004 8:53 pm
- Location: Lafayette, California
- Contact:
yep. wider = larger = greater OD
You might want to have a read in my Tech Article Archive, link below.
http://www.bevelheaven.com/Tech/9.15.2010.htm
You might want to have a read in my Tech Article Archive, link below.
http://www.bevelheaven.com/Tech/9.15.2010.htm
Steve Allen (925)798-BEVL[2385] Ride'm, Don't Hide'm
Ducati/Euro Spares -> https://Store.BevelHeaven.com
Bleeding the dam thing
I have followed the instructions, which were great (especially as I spent ages trying to find some sort of circlip), to rebuild the master cylinder but for the life of me I cannot get it to bleed. There just does not seem to be any fluid getting through the master cylinder and into the system. It is going to be something really simple and I'll look stupid, but better to ask! Any ideas?
-
BevHevSteve
- SITE OWNER
- Posts: 2325
- Joined: Wed Mar 10, 2004 8:53 pm
- Location: Lafayette, California
- Contact:
either the bore is bodged up, or you have not fully seated the thing in place or 1 of the TINY holes is blocked, or your bellows has collapsed or you have a gigantic air bubble somewhere else in the system you have not got out yet.........
Steve Allen (925)798-BEVL[2385] Ride'm, Don't Hide'm
Ducati/Euro Spares -> https://Store.BevelHeaven.com
-
BevHevSteve
- SITE OWNER
- Posts: 2325
- Joined: Wed Mar 10, 2004 8:53 pm
- Location: Lafayette, California
- Contact:
good deal
Steve Allen (925)798-BEVL[2385] Ride'm, Don't Hide'm
Ducati/Euro Spares -> https://Store.BevelHeaven.com
-
DM860SS_90003*
- Cucciolo - the Lil Pup
- Posts: 14
- Joined: Wed Aug 24, 2011 2:54 pm
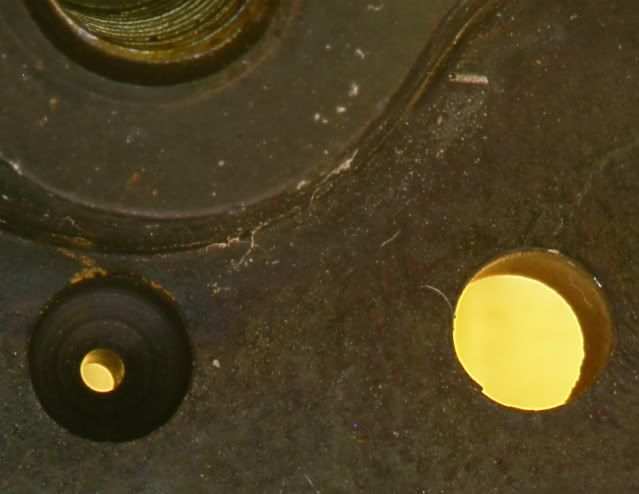
Just how tiny is this (banjo side) hole? From the top side it looks to be the same size as the lever-side hole but looking along the bore the hole isn't obvious at all - unlike the lever-side one which appears to be the same size as it is when viewed from above.
Background.
When moving the bike (MHR) after standing for 11 years and first applying the front brake I noticed it stuck on and the brake lever stayed in the half in/half out position.
When I nudged the lever out to it's natural resting position it was easy to move the bike. This was repeatable and so I reckoned it was less to do with the calipers and much more to do with the master cylinder.
Edit:
I knew there was a reason for buying that macro lens